I cried when he gave it to me. It’s gorgeous! Love you honey!
%5B4%5D.jpg "Tea Set (4)")
%5B4%5D.jpg "Tea Set (7)")

This is what I have been doing in my free time…


These were gifts this year, but I am thinking about selling similar ones on Etsy. What do you all think?
Dear Friends and Readers,
I hope you had a wonderful Christmas this year! We had a very Georgian Christmas with some of our closest friends. Here are the pictures.
Waiting for the guests to arrive.

Gico and I cooking.

The spread. The food was amazing.
Captain and Mrs. Cartwright

Colonel and Mme de Valois

Mme de Bordeux

Sir Thomas and Me

The whole group.

I hope you all are having a wonderful and blessed Holiday Season so far. I have to say this is by far one of the best Christmas Seasons of my adult life. I am thoroughly loving being a housewife and I am so thankful that it came this year. Aaron and I are also preparing for our Georgian Christmas, like we had last year. However, we are having more people over to join us this Christmas. It should be lovely and I promise to post pictures of the day. Have a lovely rest of your week and once again Merry Christmas!
Love Lauren
There is something so thrilling when I finish a new gown. It’s a very unique feeling to see my creations completed. I’m very happy with this gown. It fits like a dream and the colors turned out better than I had hoped. As usual it fits me better that the dress form, but you will have to wait till after Christmas to see the gown on me. In the meantime, enjoy the pictures on my dress form.


So, I have lovingly dubbed the gown the Kermit Dress, due to it’s striking color resemblance to Kermit the Frog. It is coming along quite nicely, although it has undergone a few changes in design since I started it. I had originally intended to trim the bodice, but unfortunately, once I go the trim on, it made me look like a 5 year old with too many frills and lace. So, I nixed the trim and I am much happier with the overall bodice. It’s much cleaner and now it won’t be locked into being a strictly Christmas dress. Here are the pictures so far, enjoy.
God Bless!
Love Lauren
Yes, I took the plunge and decided to try my hand at dying fabric. The results weren’t exactly how I had envisioned them, but I’m really happy with the final result. In fact, the color turned out better than my original idea. So, I’m making a new gown for to wear for our Georgian Christmas Party. However, I’m hoping I can wear throughout the year and not only at Christmas. Here are the pictures so far.

The dyed fabric. It reminds me of a Granny Smith apple.

The overall shape of the gown.

The gown on the left is very similar to the color of both the main fabric and the trimmings I chose. I plan to use red silk ribbon and white lace around the neck line and sleeves, and a silk red sash around the waist.
It’s coming along rather quickly and I hope to have finished photos in the next couple of days.
God Bless!
Love Lauren
Dear Friends,
I have been shamefully lacking in the blogging and posting department. I have been very busy with house work and sewing and general homey things. I am very happy and very content with my new position at home.
Mrs. Cartwright and I originally started out to create a zone front jacket for her. However, the fabric, silk velvet, would not cooperate with her original idea and was too limp and the drape too heavy for tailoring. So, we went for plan B… This drawstring Jacket.


My version, with a few alterations per Mrs. Cartwright’s wishes.


The next step is to create a petticoat for her out of a gold striped silk organza.
I hope you all have a lovely rest of you week. I hope to have more to post soon. As for now, I’m adjusting to my new routine and preparing for the Holidays. God Bless!
Love Lauren
Dear Friends and Readers,
I have been very absent from the blogosphere this week. Ever since I left my job on Tuesday, I have been in a weird and wonderful state of trying to settle into a new routine. I decided to take things a little easy this week before jumping into full time housewifery next week. Aaron has been so excited and happy to finally have me home. I have been really happy as well. It's hard to describe what I feel, but I guess an overwhelming sense of peace and joy is what I have been feeling. I also am realizing, though I knew this, that house work is enjoyable, but hard work. I'm very happy to finally be serving my Lord and my husband this way. I promise to have more real costume updates soon, once I get settled again. In the mean time here is an amazing video my mom told me about. You must watch it!
I am officially a housewife!!!!!! More costumey posts will follow, I promise. Now, I must adjust to new schedule, yeah!!!!
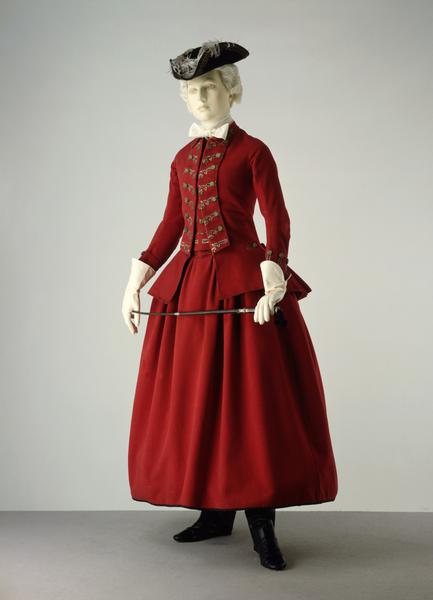
I finally had a chance to take some pictures of the jacket I am working on for Mrs. Cartwright. Enjoy!

The inspiration… A Zone Front Jacket from the Kyoto Costume Institute.

The fabric, a navy silk velvet, and the trim, gold fringe. I will need to trim the trim a bit, it is too long.

Drafting the Pattern. I used her Riding Habit bodice and JP Ryan Robe l’Anglaise bodice as a guide.


The first mock up on the form. The dress form does not give it the right look, but it allows me to get an approximation of her measurements. It’s at the fittings that I do most of the adjustments. Also, the bodice will lay smooth on the wearer, without the folds caused by the dress form.

I put the mockup on the form with the seams on the outside. It looks really goofy, but it allows me to make adjustments. The peplum will be pleated and there is not a waist seam.
I will keep posting the progress. Have a lovely Thanksgiving!
Love Lauren
+Angelica+Peale++and+Alexander+Robinson.+Reynolda+House,++Museum+of+Art,+Winston-Salem,+North+Carolina.+Reproduction+at+1st-art-gallery.com..jpg)


Sir Thomas and I attended a small gathering at the Ainsworth Estate on Saturday Eve. We joined the de Valois’ and Mme de Bordeaux for libations at a local tavern before arriving at the estate. The evening was quiet and we spent the time laying whist and drinking fine wines and ports at the card tables. It was a relaxing evening full of diverting conversation and company.
Sir Thomas
Me
Colonel de Valois
Mme de Valois and Me
Us
It never ceases to amaze me how a few wrong fabric choices, ill- fitting undergarments, and poor tailoring can take what could be a beautiful garment and throw it into the Crimes Against Historical Clothing category, aka Farb. Now, I have a few monstrosities buried in the depths of my closet never again to see the light of day. Every costumer does, it's all part of the learning experiences, the building blocks for learning how to create beautiful clothing. So hopefully, you can learn from my mistakes with a few tricks I have picked up along the way... Enjoy!
 First and foremost, research, research, research. I cannot stress it enough. We are very blessed to have volumes of books written about historical clothing and how to recreate it accurately. Not to mention the scores of sites and blogs devoted to historical clothing and sewing techniques. We have the information right at our finger tips; use it and learn as much as you can from it. Also, ask questions, lots of questions. This is one thing that I still do with many of my projects. I seek out costumers who are more skilled and experienced and pick their brains. You will find that most people are more than happy to share what they have learned and know with you.
  |
| 18th Century Cartoon Showing the Female Shape with Stays |
 |
| Original Dress from 1795 |
 |
| Mantua Maker's Shop |
 Finally, the way you act, stand, speak, and carry yourself makes a huge difference in your overall appearance. Digging out your cell phone and talking about work at a historical event puts a damper on the willing suspension of disbelief. However, acting as one would have in the time period you are portraying not only creates a new dimension of realism, it's much more fun. What is the point of reenacting if you bring the modern world along, in my humble opinion.


